| New article in progress. Stay out! This means you. No ninjaedits, Creeper!! <3 |
| Kfreon created and develops TPF/DDS Tools for ME3Explorer. |
| TPF Tools permanently alters your game files and cannot be used to install textures without first generating a texture tree. See Getting Started and Texplorer before continuing. |
TPF/DDS Tools ("TPF Tools" for short) is the toolset's user-friendly texture installation utility. With it, new textures can be permanently installed into all three games. TPF Tools is compatible with TPF, MOD, and an assortment of image file formats. It also has the ability to use and create a new format, the "METPF", which has better compatibility with the toolset, but cannot be used with Texmod. Last, but not least, TPF Tools has the ability to "autofix" improperly formatted textures loaded into the program, and can bundle textures into new TPFs or METPFs for distribution.
Background
TPF Tool's first iteration was an amalgamation of Saltisgood's TPF Viewer, and the old TPF-To-MOD functionality in Texplorer. TPF Viewer allowed the contents of a TPF to be viewed without prior extraction, and the TPF-to-MOD function allowed direct conversion from TPF to MOD files. The mature version of TPF Tools has expanded on these functions several times over, and is one of the most-used tools in the toolset today.
Before using TPF Tools for the first time, it's helpful to become familiar with basic information regarding how textures are handled in the trilogy. This will help you better understand the textures you're loading, portions of the GUI, and error messages in the tool. Consult Textures in Mass Effect for details. Similarly, An Intro to Mass Effect Mods provides additional information on TPF, MOD, and DDS files, while also explaining details about mod install order and more.
Preparation
TPF Tools itself is a simple tool, however a significant amount of preparation is required before it may be used.
DLC Extraction
If you want new textures placed in your BioWare DLC, then they must be extracted prior to installation. To do this, see the ME3Explorer Setup Guide.
Treebuilding
TPFs/DDSes may be loaded into TPF Tools without a texture tree for viewing, but to install the textures, a tree must be present for the desired game. Consult the Texplorer article on how to build a tree for each game in the trilogy.
Texture Files
TPF Tools is compatible with the following file types: BMP, DDS, JPG/JPEG, METPF, MOD, PNG, and TPF. To use the tool, you must have access to one or more of these files, either extracted from the game and edited yourself, or as downloaded from a hosting site like Nexusmods. For more information about valid file types and mod formats for the trilogy, see An Intro to Mass Effect Mods.
Usage
TPF Tools's interface a bit less technical than Texplorer, but there's still a lot of information present. This section will carefully step through the GUI, explain how to use the tool, and clarify how to combat issues with incompatible textures.
Load File
TPF Tools has two main panes that will be empty when opened. To populate the panes, either drag and drop the desired file or use Load and navigate to its location on your computer.
Unlike a majority of other tools in the toolset, TPF Tools has a somewhat interactive interface. Scrolling over certain GUI elements, triggers a popup that describes their purpose. Clicking the Help option on the top-left, shows all pop ups at once. Clicking it again, brings you to this wiki page.
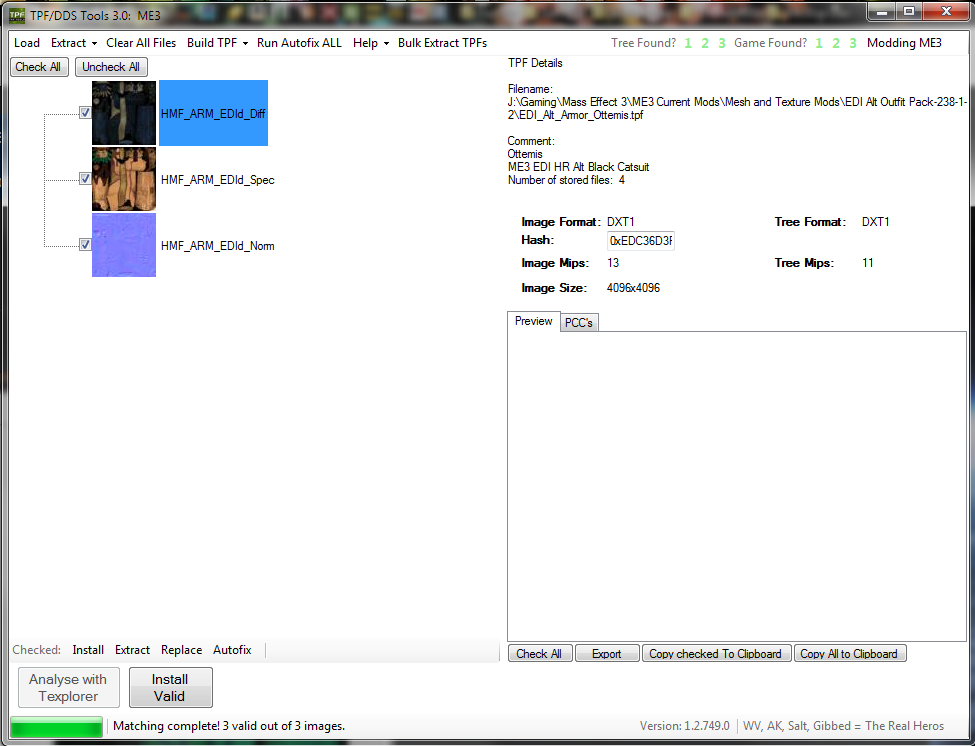
The Left Pane displays the following features:
- Top Menu — Contains a variety of options we'll cover in different parts of this article.
- Main Page Tab — Displays the loaded textures. Provides a thumbnail for each, their name, and information about validity. Also depicts the Texmod.def file, which is used when creating a TPF. The toolset reads this information, but the file isn't "installed", as it's not a texture. Arrow keys can be used to navigate through the textures.
- Delete Page Tab — Content Forthcoming.
- Context Menu — Allows for of individual, texture-specific operations.
- Bottom Menu — Operations that generally affect all textures.
- Progress Bar — Fills and displays status updates as operations are performed (e.g, "15/20 textures installed", "Autofix complete.").


The Right Pane displays the following features:
- Texture Tree Indicators — Indicate whether existing texture trees are present for each game. When using for the first time, they will be red, as no trees are present. All indicators for games you have installed and want to mod should be green. To generate trees, refer to the Texplorer article.
- Game Path Indicators — Similar to the Texture Tree Indicators, all indicators for games you have installed and want to mod should be green. If this isn't the case, use Change Game Paths to define a new path. Paths should lead to each game's ..\BIOGame folder. Don't proceed until the path for the game you want to mod is detected properly.
- Game Modding Indicator — This defaults to Mass Effect 3. If you wish to mod a different game, just click it to cycle between all three games in the trilogy.
- File Pathing and Mod Authorship — Just underneath the indicators. Specifies the path and name of the loaded TPF/selected file. When a TPF, the Comment area contains the comment written by the mod author.
- Texture Details — Compares the selected texture to its counterpart in the game files. Properties on the left are for the loaded texture, properties on the right are for the existing game texture. Formats should always match; though mipmaps won't in the case of higher resolution textures. The hash field is editable, in the case of a mismatch. For more details on hashes, consult the Texplorer article.
- Preview Tab — Enlarges the selected texture to allow for closer inspection. The texture scales with the window.
- PCC Tab — Displays all PCCs that reference that texture. These can be selected/deselected to control which files are modified with the new texture. To select/deselect all, use the Select All button. Copy to Clipboard copies the list of affected PCCs to the clipboard. Similarly, Export, exports the list to a TXT file. Both can be useful as a post-installation reference for textures that affect many PCCs. Only selected PCCs will be copied into the list.
- Tool Version and Toolset Authorship — On the bottom right.


Analyze + Configure
Once you're certain your game paths are correct, the proper texture trees are present, a file is loaded, and you've had time to orient yourself to the GUI, it's time to configure your texture installation parameters.
Note that none of the configuration options affect the loaded file itself. The TPF/texture file as it exists on your HDD is not affected; changes are saved to a temporary location and applied upon installation, only.
- Analyze with Texplorer — This is the first step. Clicking Analyze with Texplorer matches the loaded textures to those in the selected game. When a match is found, the texture file name changes to match the tree name. Raw images (DDS, BMP, PNG, JPG) must have hashes for the corresponding vanilla texture in their file name. TPFs and MOD files come pre-built with these hashes. Every time additional textures are loaded, they must be re-analyzed to find their match in the tree.
- Autofix — Improperly formatted textures are tagged with arrows (">", "<") and brief description. Consult the FAQ on this page for specific details on various error types. These textures MUST be fixed and made "valid" before installation. The toolset will not install invalid textures. Individual textures can be selected and fixed with Autofix, or Run Autofix can be used to fix all invalid textures. If an expandable node appears to the left of any loaded texture, then you have a "Duplicate" texture and also need to see the FAQ before proceeding.
- Delete Unwanted Textures — WIP Thumbnails of textures you don't wish to install can be deleted via the "Delete" key on your keyboard. This action moves them from the Main Page to the Delete Page in the left pane.
- Change Hash — Consult the FAQ below. Most users won't need to use this feature, but it is especially handy for copying and pasting a hash into Texplorer's Search Bar.
- Replace — Replaces the selected texture with another of the user's choosing. Just navigate to the proper location on your PC.
- Select PCCs — This is the bread-and-butter of TPF Tools. You can choose exactly which PCCs will use the new texture. Base game, BioWare DLC, DLC mod, whatever. Select the ones you want, deselect the ones you don't. You must do this for each texture. All PCCs are selected by default; most users will want to apply the texture to all PCCs.


Install Textures
Clean TPF ready for installation.
Only proceed with texture installation when you have met ALL of the following criteria:
- No textures are tagged with "format" or "mips".
- Any textures tagged with "not in tree" are for a DLC you don't own -- or you don't wish to install that texture.
- You have dealt with any textures that have File Duplicates (expandable nodes).
- You have removed any textures you aren't interested in using.
- You have customized PCCs for each texture, or want to install to all necessary PCCs.
When all the above are true, proceed with one the following options:
- Install Valid installs all valid textures in the Main Page window.
- Install installs a single, selected texture.
- Autofix and Install autofixes and installs all textures with one click; this option is appropriate for more advanced users who have a bit more experience with the tool.
Clear All Files clears the Main Page, readying the tool for a new batch of textures.
Other Operations
In addition to texture installation, TPF Tools has functions for extraction and TPF creation. These tend to be geared toward mod authors, but are appropriate for more advanced users, as well.
- Texture Extraction — Extracting textures is useful if they need additional editing or manual repair via Image Engine. There are four ways to extract textures loaded into the tool:
- Bulk Extract TPFs — Extracts all textures for each TPF loaded, sorts them into separate subfolders, and saves them to a location of your choosing.
- Extract (Bottom Menu) — Extracts the selected texture.
- Extract (Top Menu) — There are three options within this menu, all of which are self-explanatory.
- TPF/METPF Building — WIP
FAQs
All common questions and issues that relate to TPF Tools.
ANALYZING -- One or more of my textures is tagged with "<----MIPS".
Just click Autofix. This should re-format the texture to make it compatible with the vanilla game. If successful, the MIPs tag will disappear and the Status bar at the bottom will indicate "Autofix Complete".
If Autofix fails, your only choice is to extract the texture and edit it manually for compatibility. This will be the exception to the rule; Autofix works quite well.


ANALYZING -- One or more of my textures is tagged with "<----FORMAT".
See the FAQ above for MIPs.
ANALYZING -- One or more of my textures is tagged with "<----NOT FOUND".
This means the texture isn't present in your current texture tree. It may or may not be a problem and has three causes:
- The hash assigned to the loaded texture is wrong, so TPF Tools can't match it to the correct texture in your tree.
- You ran your Texplorer scan on texture-modified files, so your tree contains modified, non-vanilla hashes for this texture (and likely others).
- The texture is for a DLC that you don't own.
The first two are problems, the third is not. To solve the first issue, use the directions in this article to extract the texture, rename it, and then replace the incorrect version. To solve the second issue, search for the texture in Texplorer and edit the hash in TPF Tools so it that matches your tree. Or, better yet, vanilla your game and then re-build your tree on vanilla files. The third case does not need special action. TPF Tools will ignore the invalid files upon texture install.
ANALYZING -- I have "Duplicate" textures. What do I do?
There are two causes of Duplicate Textures; only the second scenario is cause for concern and needs to be dealt with:


- Tree Duplicates — A small amount of textures in the game with different names share the same hashes. Their file names will be in italicized in the Main Page just to bring you attention to the situation, but they can be safely ignored.
- File Duplicates. This occurs when multiple textures affecting the same hash (game texture) are loaded at the same time. When this happens, TPF Tools will display a collapsible "node" to the left of the Primary texture. Expand the node and you can see all alternatives to choose from. If you wish to use the Primary texture, you don't need to make any changes. If you prefer to use one of the others, select it, and then click on Promote Duplicate.
ANALYZING -- Is there anything I can do about modified hashes?
The best thing to do is revert to vanilla and re-build your tree. This will ensure all textures and hashes are vanilla.
However, if you only need to swap out a texture or two, it's possible to use the editable hash feature in TPF Tools to change the hash to match your existing tree. Just do the following:
- Load up the new textures you want to use in TPF Tools; use the directions on this page to analyze, etc.
- Select the texture with the incorrect hashes (which will be tagged "Not found in tree")
- Look up the name for this texture in Texplorer and copy its existing hash
- Paste the new hash for the selected texture into TPF Tools.
- Install the new texture.
INSTALLING -- Are there any texture load/install limits?
Yes and no. The more textures you load to install at once, the harder it will be to track down any errors that occur. Ultra HD textures (4K, 8K) will put a larger strain on the tool, so loading many of those at one time could lead to problems. We suggest experimenting to see what you're comfortable with.
Related Tutorials
Section reserved for relevant tutorials.
| Kfreon's forum tutorial for TPF/DDS Tools 3.0 contributed to the creation of this article. |